New Book Coming: Building Thinking Classrooms in Mathematics

A while back I was approached by Corwin Press about the opportunity to illustrate a book being written by Peter Liljedahl about the Thinking Classroom framework. Who, me?

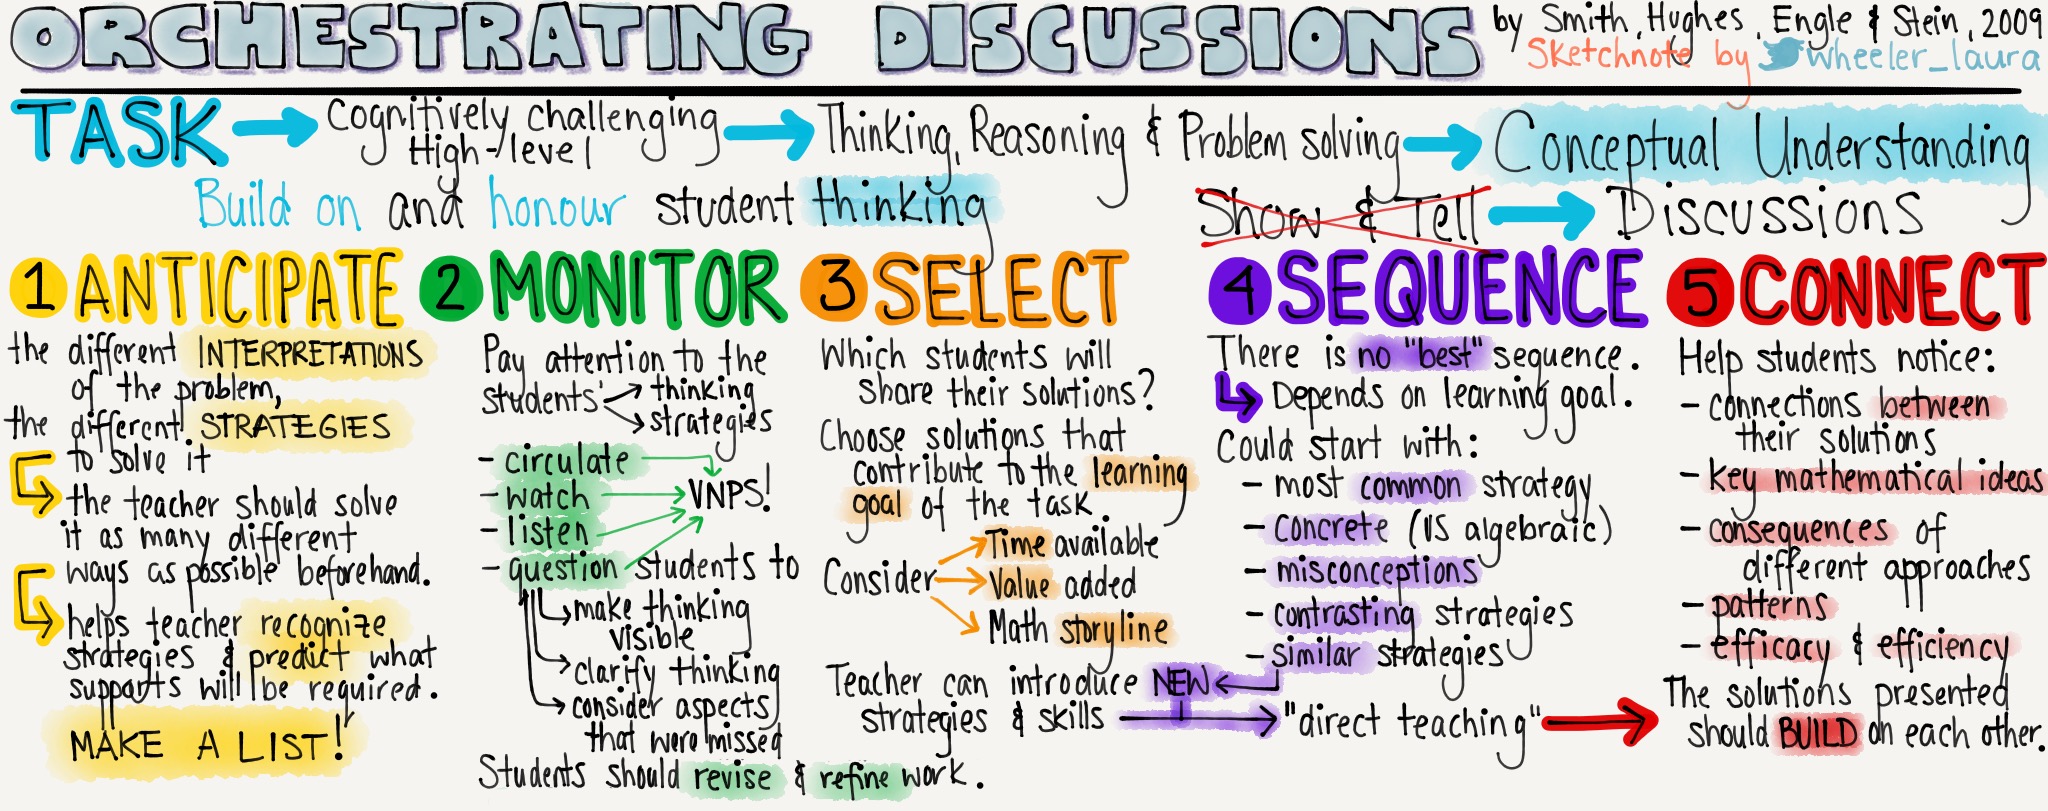
I am far from being an artist or illustrator. But years ago I created a sketchnote about the elements of the Thinking Classroom that seemed popular on Twitter as more of us learned about this teaching framework. Shortly thereafter I updated it to include the most recent elements of the framework Peter was sharing. I think based on these sketchnotes Peter may have given my name to Corwin as a possible illustrator. But I was VERY reluctant to say yes to illustrating the book. What do I know about illustrating? I sketchnote to share what I’m learning about. My sketchnotes are often text heavy and the illustrations I do make are full of rudimentary stick figures. I mentioned the opportunity to a colleague, explaining how reluctant I was to take it on as I did not have confidence I could produce something good, and she really pushed me to do it even if it was outside my comfort zone.

So I said yes to Corwin. Full of nerves. I also told them straight up that if what I produced wasn’t up to par that they were welcome to tell me so at any time & go with someone else for the job. I stayed quiet about the whole thing as I got to work on it, not because I wasn’t excited about it, but because I really had this nagging feeling that at any moment they were likely to come back to me and say the drawings are not quite what they were hoping for & they’d have to go with a proper illustrator.

Then last month Peter tweeted this:

. . . and it was at that point that I thought, well I guess they won’t fire me now that it’s been announced I’m illustrating it!

I have since finished all the illustrations. And man do they every take longer when they need to be good! Normally I’m sketchnoting just for me. I share them online, yes, but the quality is less important as I’m making them to help myself remember & make sense of what I’m learning about and to share that with others. “Ideas, not art” as Mike Rohde says. So I was really shocked to see how long each sketch was taking when creating something that needed to be as excellent as I could possibly make it in order to do Peter’s ideas and research justice. I finished the edits they asked for this week. And just yesterday I got to see the cover for the first time! With my name on it 🙂

I’m so excited to get my hands on a copy of this book. I have learned so much reading it even after having used this framework for 6 years in my classes. There are so many subtle teacher moves and nuances that you can master to increase its effectiveness and this book covers it all! When it’s ready for orders you can be sure I’ll post the news here!

– Laura Wheeler (Teacher @ Ridgemont High School, OCDSB; Ottawa, ON)

Building #ThinkingClassrooms

[update: There are now 14 elements in the Thinking Classroom framework – an updated sketchnote can be found here]

Almost 3 years ago now, some math teachers in our school board returned from a conference with two concepts from the research of Peter Liljedahl; vertical non-permanent surfaces (VNPS) & visibly random grouping (VRG). I was blown away by these 2 strategies & implemented them in my classroom immediately after learning about them.

Peter tells a great story about a Math teacher saying upon meeting him “Oh, you’re the vertical surfaces guy!”. While he’s happy that teachers are finding benefit from implementing VNPS in their classrooms, he hopes those teachers will be inspired to go even further and delve into the 11 conditions Peter says will help us build “Thinking Classrooms”. A thinking classroom is . . .

“a classroom that is not only conducive to thinking but also occasions thinking, a space that is inhabited by thinking individuals as well as individuals thinking collectively, learning together, and constructing knowledge and understanding through activity and discussion” (Liljedahl, 2016)

In his chapter titled “Building thinking classrooms: Conditions for problem solving” Peter outlines 11 practices teachers can adopt in order to build a Thinking Classroom. Actually, I think that chapter proposes 9 of them, and Peter has an upcoming chapter to be released that details all 11 practices that his most recent research has unveiled. Here is my sketchnote summary of those practices:

Thinking Classroom.PNG

Building a thinking classroom:

  1. Begin with problems/tasks
  2. Visibly random groups
  3. Vertical non-permanent surfaces
  4. Oral instructions
  5. Defront the room
  6. Answer “keep thinking” questions
  7. Build autonomy
  8. Hints & extensions to maintain flow
  9. Level to the bottom
  10. Student-created notes
  11. Assessment

That last one is the one I am the least clear about what it entails. I heard Peter say in a talk that it would take him another 3 hour session just to cover that piece alone. I’m hoping that the more I explore his publications, the more I’ll learn about what he proposes for assessment as I am keen to get away from tests & make my assessment match my classroom time.

For more of my posts on Peter’s Thinking Classrooms work, click here.

Peter’s Thinking Classroom research can be found here.
He provides some “good problems” so you can start with the 1st step, here.
You can watch a 1-hour archived webinar by Peter on the topic here.

Update: I wrote an article for Edutopia about the first 3 elements of the Thinking Classroom – good tasks, VRGs & VNPSs – that you can read here https://www.edutopia.org/blog/student-centered-math-class-laura-wheeler

[update: There are now 14 elements in the Thinking Classroom framework – an updated sketchnote can be found here]

– Laura Wheeler (Teacher @ Ridgemont High School, OCDSB; Ottawa, ON)

Video clip of students at work

Today while Ms. Fahmi, my student teacher, was teaching I went to take a photo of the students at their boards solving in their groups. Then realised that I should try taking some video since there are several of us in the room & I can take the time to do so (I had parents choose at the beginning of the year whether or not they were comfortable with me including photos & videos of their child in class on my professional learning network platforms)

Here is a quick (1 minute) video clip of my students working on a visual patterns 3 act math task on vertical non-permanent surfaces in their visibly random groups:

– Laura Wheeler (Teacher @ Ridgemont High School, OCDSB; Ottawa, ON)

#Sketchnote: 5 Practices for Orchestrating Mathematics Discussions

I’ve been hearing about this book lately, 5 Practices for Orchestrating Productive Mathematics Discussions By Mary Kay Stein, Margaret Schwan Smith. I still haven’t gotten around to ordering & reading the entire book, but I did read a shorter article that one of the authors wrote on the same topic. And as I’ve been doing more & more lately, I created a sketchnote summary of the article to help me organize my thoughts & to share with others:

5 Practices Orchestrating Mathematical Discussions.PNG

– Laura Wheeler (Teacher @ Ridgemont High School, OCDSB; Ottawa, ON)

What I Did Differently This Year

A roundup of things I did differently, or that I continued to evolve with, this year in my Math classes:

Visibly Random Groups

Groups of 3 students sitting together. New partners & new desks every day. I used playing cards given out at random as students entered class to assign students to tables – with hanging numbers indicating which tables made which group. More details about VRGs here.

Kahoot!

2 to 3 days per week I used Kahoot as our bellwork. Kahoot is an interactive quiz that the kids answer using cell phones/tablets/laptops. I have created a bank of basic skill-based multiple choice questions for each of my courses and we often start class by playing 10 randomly chosen questions. Correct answers get points & the faster you answer, the more points it’s worth. The kids really love this & it’s a great way to practice basic skills.
What’s especially cool about Kahoot is that they have pre-made question banks for lots of different topics and courses, so you can play this with almost no prep work required. Julie Reulbach does a nice job of outlining her experience with Kahoot this year in a blog post here.

Problem-based Learning

As much as possible, I try to start with a problem to solve, instead of starting with a lesson. Sometimes this is a hands-on activity in the style of Al Overwijk & Bruce McLaurin. Sometimes it’s 3-act math in the style of Dan Meyer. Other times it’s a word problem from a textbook stripped down to make it more open (like here & here) and solved on vertical non-permanent surfaces (see next). Students always started by estimating the answer (too low, too high, best guess), collect data/measurements if needed, and then solve. And at whatever point students get stuck, or need to learn something new, that is where I go to the board for a mini-lesson before having groups return to finish solving the original problem given their new knowledge/skills.

Vertical Non-permanent Surfaces

In our visibly random groups of 3, we solve the problems on whiteboards & blackboards. This gets students up out of their chairs, working together, thinking. They try out different ideas because they know it’s easy to erase whatever doesn’t work. It allows me to see everyone’s work all at once and give prompt feedback on their progress. Students can also look around at other boards to get ideas if they’re stuck. More details on VNPSs here.

Khan Academy

Now hold on with your booing & your hissing … Math teachers love to have a hate-on for Khan Academy. It’s not a replacement for a math teacher, and it has it’s disadvantages, but they have some good exercise sets that can be used as homework instead of problem sets from the textbook. At the beginning of the year the homework on KA was optional as I explained here, but in the 2nd semester the homework for my grade 10 academic class was mandatory and tracked daily.
The students sign up with you as their “coach”. You can set a certain exercise as homework with a due date. The site then summarizes who has and who has not finished their homework. You can also see how many problems they have attempted to solve and whether or not they got the correct answer. The advantage for the students is that if they get stuck, there is a “hint” button (which isn’t so much a hint, as the next step explained) and a link to the infamous KA-created video related to that specific problem.

Spiralling

Instead of teaching unit by unit, I have continued spiralling the curriculum. This means teaching every expectation in the curriculum over the first few weeks, albeit in an introductory fashion. Then we cycle through all the material for a 2nd time, delving deeper. And then again a 3rd or maybe 4th time through depending on time. Mary Bourassa has a good explanation here of spiralling.

There are a few smaller things I introduced also such as the wireless keyboard, a “tech tub” with 5 chromebooks for students to borrow when needed, posters of course expectations & mathematical processes on the walls, etc.

For next year:

  • Make my evaluation tools match the group-work, problem-based learning we do in class.
  • Work on recording the observations & conversations that can inform a student’s final grade in addition to the products they create (tests, tasks, projects, etc).
  • Improve my Link Crew class that I taught for the first time last year.

– Laura Wheeler (Teacher @ Ridgemont High School, OCDSB; Ottawa, ON)

VNPSs to the rescue!

This month I have a student teacher teaching my two grade 10 classes each morning. He’s been doing a great job trying out the spiralled curriculum & activity-based teaching approach that I use. He’s also continued using the visibly random groups (VRGs) & vertical non-permanent surfaces (VNPSs) that I have set up in my classes. Today we had a moment that really cemented for us why the VNPSs are so powerful:

A bit of background first. This year I’m teaching the primary trig ratios using trig trainers & a trig table. The trig trainer provides the sine & cosine values for a right triangle with a hypotenuse of 1. Students then use similar triangles to solve for missing information like this:

Screenshot 2015-04-15 at 10.50.27 AM

So far we had covered how to find missing sides, but not yet how to find missing angles using this method. The students had all the knowledge they needed to do so, there was nothing new to teach them besides how to apply their knowledge in a way to find a missing angle.

So yesterday my student teacher started his lesson by putting this problem on the board:Screenshot 2015-04-15 at 10.46.12 AM

He asked the class questions about how they used the trig trainer to solve for missing sides (activating prior knowledge) to elicit ideas about similar triangles and scale factors. He then asked them how they might use the same ideas in order to solve this problem.

Crickets.

Nothing.

No answer.

There were a few awkward minutes while he waited for them to figure out how to apply their prior knowledge to this new example type. He tried rephrasing his question but they weren’t giving him anything. They weren’t willing to venture a guess out loud. He was hoping they would suggest to him the method to solve for the missing angle & he would solve it on the board for them (direct teaching).

But I suspected that if asked them to, most of the students could solve the problem based on what they’ve learned so far, even if they couldn’t verbalize how to do so (or weren’t willing to verbalize it). So from the back of the room I piped up & suggested sending the groups to their assigned vertical surface (each group has a blackboard or whiteboard space assigned to them). My student teacher obliged & sent them to their boards.

Within one or two minutes a couple of the groups were solving the problem – using the exact method that my student teacher hoped they would explain to him in the earlier discussion. The groups that didn’t figure it out right away looked at the boards of those groups that had & quickly caught on to the idea and started solving themselves also. Here is the solution from one group:IMG_8438

Once most groups had solved it, my student teacher asked them to return to their desks & consolidated their learning with the whole group and then assigned some practice problems.

This experience really drove it home how beneficial the vertical surfaces are. When asked to explain orally how to solve the problem, students were not able. But working on the problem at their boards, most groups solved without having to be taught how to do this specific type of problem. And those that didn’t get to the final answer were still able to see the full solution presented, and done so in multiple ways by different group.

So powerful!

Visibly random groups & Vertical non-permanent surfaces

I have been trying to shift my Math classes toward activity- / problem-based learning. We still have individual practice days, but as much as possible I want them solving new, complicated problems in groups. Two ideas that I heard about at a meeting of the OCDSB Mathematics Department Heads have really changed how I do things in class lately:

  1. Visibly Random Groups
  2. Vertical Non-Permanent Surfaces

Both ideas come from the work of Peter Liljedahl and have been gaining traction amongst OCDSB teachers lately, particularly in Mathematics classrooms.

visibly-random-groups-vrg

Visibly Random Groups (VRGs):

Original research available here.

Every day I make random groups so that my students work with different partners each day. Students are learning from ALL of their classmates this way, getting a chance to hear different viewpoints, different strategies each day. To make these random groups, some teachers use a smartphone app such as “Shuffle Names, Dice” while others use websites such as “Team Maker”.

When I first started using VRGs in my classes, I used the Team Maker website. You paste in your class list of names & it makes however many groups you ask it to. But I would have to go through the list & delete any students who were absent. This meant the groups could only be created after the bell had rung. I wanted a system that would tell students their group for the day as they arrive so that they can sit right down & get started.

So this year I have been using a deck of cards (low-tech & old school!). Here’s how I do it. I post their bellwork assignment on the screen/board before class starts. The desks in my classroom are arranged in 8 groups of 4 desks, each with the group number hanging from the ceiling above them (which you can see if you look closely in this photo).

IMG_5935For a more recent photo of my room check this post.

I stand outside my classroom door during the travel time. As my students arrive I hand them a playing card (with a number from 1 through 8 on it) indicating which group they are sitting at that day. This method for VRG has the added bonus of giving me the chance to personally greet each student as they arrive to class as well as monitor student behaviour in the halls during transition times.

The conversations I hear between students while problem solving this year are far richer than previous years & I believe it also contributes to a positive culture of collaboration & sharing in my classroom.

Peter Liljedahl’s research shows the following benefits for VRGs:

Vertical NonPermanent Surfaces VNPS.PNG

Vertical Non-Permanent Surfaces (VNPSs):

Original research available here.

After we finish the bellwork activity to start class off, I usually present the problem or activity of the day (often done in Dan Meyer’s 3-act math style). Students solve the problem in their small groups (I try to limit each group to 3 students – which works when my class has 24 students or less). They get out of their seats & proceed to a section of blackboard or whiteboard assigned to their group in order to solve the problem together.photo

The vertical nature of the surface:

  • gets students out of their seats which seems to activate their thinking
  • allows students to see the work of other groups which gives them ideas of things to try or perhaps what not to try
  • allows me as the teacher to see the work of each group at a quick glance, which prompts me to offer feedback & question their thinking as they work

The non-permanence of the surface is important too. Students seem willing to get to work faster and are willing to make mistakes because they can be so easily erased. Pencil & paper can be erased too, but there’s something about the whiteboard or chalkboard that makes students more willing to just try something. As Peter Liljedahl’s research shows in the data below, students get to work faster, they work longer, and are more engaged:

I have two walls w/ blackboards in my classroom & the third wall (which already has a DIY whiteboard for a projector screen in the middle) will be getting fully covered with DIY whiteboards in the coming week. My 4th wall is windows, although I know other teachers that get DIY whiteboards cut to size & lean them up against windows to create student work stations there as well. (Update: I now have the 3rd wall covered end to end with whiteboards & a small “station” set up in one of the window wells on the 4th wall as well).

The rules of working on the VNPSs in my class:

  • One person has the chalk at a time.
  • The person with the chalk can only write down what their partners tell them to (if they want to explain the next step, they hand the chalk to a different partner).
  • The teacher can say “switch the chalk” at any point & a new partner needs to become the writer.
  • I also tell them that if one person does the solving & writing without partner input, I’ll erase their work.
  • No sitting down.
  • No working things out on paper before using the board.

Have you tried VRGs and/or VNPSs in your classroom? Leave a comment below!
Check out some other teachers’ experiences with these ideas like Mr. Overwijk’s:
http://slamdunkmath.blogspot.ca/2014/08/vertical-non-permanent-surfaces-and.html

Update: I wrote an article for Edutopia about the first 3 elements of the Thinking Classroom – good tasks, VRGs & VNPSs – that you can read here https://www.edutopia.org/blog/student-centered-math-class-laura-wheeler

– Laura Wheeler (Teacher @ Ridgemont High School, OCDSB; Ottawa, ON)

Pear Deck in Math Class; a Student-Response System

I’ve tried other student-response systems in the past, like Poll Everywhere, but they are clunky in that you have to exit your current slideshow / lesson material & go over to a different site to use them. With Poll Everywhere my students were always confused about what to text & to which number.
I’ve heard rumours that my school owns a set of clickers also, but I’ve never seen them.

Enter: Pear Deck!

I was introduced to Pear Deck at a session at the Google Apps for Education Conference in Ottawa earlier this month. I was immediately sold on the potential for Pear Deck in my classroom. So far I’ve used it in my Math class and Leadership class; neither of which is a 1:1 tech classroom. My students use their own smartphones and if I’m lucky enough to be able to book some extra iPads then I loan those out too.

A quick primer on how Pear Deck works if you’re interested:

Creating a New Deck:

Presenting a Deck: 

How I’ve used it in my Math class:

Here was my most powerful experience so far:
In Grade 10 applied Math, students will need to be able to formulate their own questions about a video or photo in the summative task at the end of the course (Ă  la act 1 of Dan Meyer’s 3-act math). That day I wanted to look at substituting values into formulas or equations and solving for the remaining unknown (this is the 1st overall expectation of Linear Relations for MFM2P). I could have simply prepared the questions in advance I wanted them to solve, but I decided to have them create the questions.

After having them log in to the Pear Deck presentation and a warm up problem I won’t show here, I presented this slide:

slide1

Students recognized the formula as the area of a circle. The prompt was to “create a question that could be solved using this formula”. This particular slide was a “text response” slide. Student responses started to come in:slide2

You can see that “F” started calculating something with the formula – so I was able to re-explain what I wanted to F. Some of the students are referring to area for 3D solids, so this allows me to prompt a class discussion about the difference between area & surface area. And whether or not a scoop of ice cream relates to the circle formula (student Y).

I wanted a simple problem for them to try to start. So I chose M’s question. I was able to select it & show it alone to the class using the “show student responses” feature. slide3

Notice M’s name is not displayed which is great for privacy. But of course M was very proud that their question was chosen & they promptly let the class know it was theirs. My students were then instructed to go to their blackboard station (vertical non-permanent surfaces) with their group (visibly random groups) in order to solve the problem.
They did so quickly, we discussed each team’s solution & returned to our desks & devices w/ Pear Deck.

Next I wanted to have them substitute a value for Area & solve for the radius. So this time I chose A’s question:
slide4

And again I sent them to the blackboards in their groups.

The students whose questions were selected were so proud. And they weren’t the students who would have been first to raise a hand or offer a question if I’d just asked the question orally in class. Something about the thinking time, and the ability to quietly type in their response means more engagement from ALL students, not just my keeners. It means I HEAR the quiet/shy students’ responses more often because I’m not relying on hands up & loud voices for the response; I can see everybody’s response at once.

I plan to post more on how I’ve used Pear Deck in the classroom in the coming weeks; to show you the different slide types available. I will also be giving a demonstration to the entire staff of my school at our next staff meeting because I really believe this is a powerful tool.

A few caveats:

  • Some slide types are not available in the free version (drawing & draggable). But there is a free 30-day trail of the full version.
    And plenty is still available in the free version: multiple choice questions, text-based response & numeric response. Many teachers would be fine with only the free version.
  • The fee is $100 per year for the full version for teachers.
  • You’ll need a Gmail address; this product works with Google (no problem for OCDSB teachers as our emails are all Google now).
  • There is no way to create a public link to your slides as of yet. This is a problem for me as I like to link to the day’s activities on our class website. In chatting with one of the co-founders of Pear Deck, they say they are working on an option to save the slides as a PDF file which one could then upload to a class website. I look forward to this feature very much!

How have you use Pear Deck in your classroom? Leave a comment below!

– Laura Wheeler (Teacher @ Ridgemont High School, OCDSB; Ottawa, ON)